Use of our material:
This activity was developed by Kelly Riedell
and Michelle VanderWal for students in Biology at Brookings High School.
We have worked very hard on Activities, Powerpoints/games/worksheets, etc to make this a
resource for our students. If you are using our materials, please give us credit
for our efforts by listing us as a source with links to our site.
Any questions, comments, or
corrections can be directed to us at


LIGHT WAVELENGTH EXPERIMENT

Supplies needed:
1 styrofoam cup per student in the class
Potting soil
2 corn seeds per student in the class
Water 55mL
Copy paper boxes with gel lids (see directions below)
Grow light with incandescent bulbs
1. Start saving copy paper boxes with lids so that
you have 6 (One for each color. If you have a big class, you may need multiples
of each color)
2. Order gels in a variety of colors. We order
them from a company in Minneapolis called
Stage Technology. It is a company
that sells stuff for theater. You should be able to get a catalog online. The
gels are Rosco color filters (the gels used on stage lights to make them
different colors). The gels are on page 32 in the 2007-2008 catalog. A 20" X 24"
sheet is about $7 or you can buy a 25' roll if you need a lot. (The rolls are
pretty pricey though) The sheets are big enough to fit the copy paper box
lid.
Roscolux Gels we use:
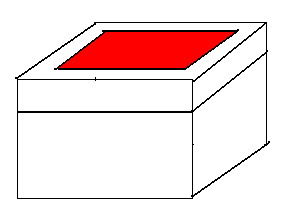
Scarlet #24
Medium Amber #20
Straw #12
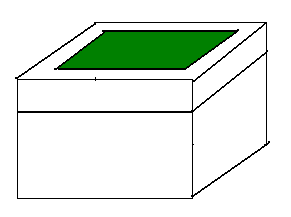
Dark Yellow Green #90
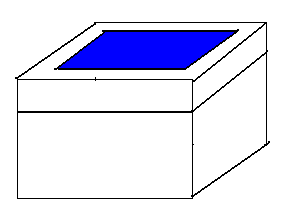
Daylight Blue #65
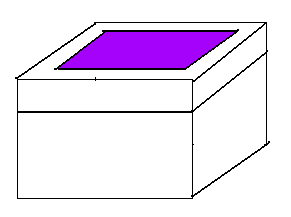
Rose Purple #48
3. Use a box cutter to cut a rectangular hole in the lid of each box and use
duct tape to attach the color gel in the opening in the lid.
4. Students can work in groups of 6. Each student
will plant their own cup and place it in a different colored gel box.
Procedure:
Lab Powerpoint
1. Use a permanent marker to write your names, your period number, and what
gel color your teacher has assigned you on the outside of your cup.
2. Fill each cup half full of potting soil. DO
NOT POKE HOLES IN THE CUP. You do not need to pack the soil.
3. Place 2 seeds on top of the potting soil in
each of your cans. Cover seeds with dirt
4. Add 55 mL of water. You will need to add
just enough water so that your finger is damp when you touch the soil. You do
not want to add so much water that you drown the seeds.
5. Place all the cups in the correct gel boxes and
cover with lids.
6. Place gel boxes under a plant light with
incandescent light bulbs.
7. STUDENTS MUST NOT PEEK. You can look at
the plants by looking through the gel lids. Once you see LITTLE
LEAFY PLANTS growing under the gel lids, then students can remove the lids, fill in
their data sheet, and answer the
questions
Back to Teacher Help
Back to HOME

Prism: http://www.animationbuddy.com/Animation/Webdesign_Elements/Random_Shapes/Prism.gif:

